Monday, June 25, 2012

Paint Sculptures: Thin Depth of Field Setup and Test

When I was looking at Linden Gledhill's photos of paint sculptures he did for Canon on flickr I noticed another series that he did for ManvsMachine design and motion studios who were making a rebrand for BTVison.


MvsM / BT Vision Rebrand from ManvsMachine on Vimeo.

In the video the paint sculptures come out of triangles, I would like to have a play and see how it looks if I did something similar with my stills.

These are some of Linden Gledhill's photos.

I really like the feel that the light blue background gives the photos.  The lens is focused to the very front of the paint drops before the photos are taken.

This is the setup I quickly put together to try this.  I got a white piece of paper and wrapped it around the speaker and clamped it to some boxes.  I used two flashes on the right hand side, one was directly aimed at the paint and also lit the background, the other was on a 90 degree angle to the camera and is hitting the very front of the paint sculpture for emphasis and to create shadow, but also reflecting off the white paper around the paint for fill light.


Most of the images came out similar to this one, excessively blurred and messy looking.

Some were a little better though.  Next time I try this I will try a subtly coloured background and focusing a couple of millimeters in front of the paint to ensure that I capture the areas that are in focus.


Sunday, June 24, 2012

Paint Sculptures: Setup, Images and Edit

This is the setup I am currently using to take paint sculpture photos.  I have three flashes on the right all with diffusers and on their lowest power settings.  The white piece of paper next the the three flashes is blocking the light from hitting the black card background and the other piece of white paper is adding fill light with the help of another flash on the left to the left hand side of the speaker.  All the flashes are connected two the Camera Axe 4 in ports 1 and 2.  A microphone taped next to the speaker is triggering the delay in the Camera Axe and then the flashes.

To control most of the paint splatter I cut the bottom off a 1.25L fizzy drink bottle and  placed it on the speaker over the paint.  I cut the front and back out of the bottom of the bottle for the camera too shoot through.


These are some of the images straight from camera.  On the sides of the image is the bottom of the bottle which is easily edited out.

 I am going to buy some lube of some sort that does not mix with the paint to increase the shine and reflection on the membrane.


I didn't like the look of the white membrane so I tried editing it to black.


I made it simple and used a brush in lightroom to under expose the membrane.


These are some of the final images. 


I really like how they came out.  Some of the bases of the paint sculptures have also been brushed over and it makes the image look a little odd.  If I spent some more time on the images I could do a better job.

XL Paint Sculptures: Setup and Test

Last night I completely changed my paint sculptures setup and super sized it! After talking to Speaker Bits a repair and speaker retailer in Port Melbourne they told me that the Alto 12" PA speaker would be able to easily cope with what I was wanting it to do.

Alto 12" PA Speaker
The Alto has a peak of 360 watts at 8ohms which is higher then the Sony STR-AV320R amplifier at 8ohms. The new setups aim is to capture images similar to Martin Klimas's images of paint sculptures.
Martin Klimas
The first thing I need to do for this setup is to get more paint.  So I went to school to see what they had there.

I had 16 contains and had the choice from 20 or so paints.  So I got three different reds, greens, yellows, blues and a pink.

I set the speaker on a milk crate (depending on how high the paint goes I will change the height to an easier working height) I put a sheet over the ground and another held up by two poles to protect the wall.  For the sides I am using large polystyrene boards with a silver reflective coating.  These will contain the flying paint and also act as an easy to use large reflector that I can bounce light off to soften and use as fill.

The speaker was at an annoying height so I raised it with another crate and put the new latex frame and sheet that I made over the top.   I placed two flashes on a stand together on the right hand side of the speaker at a 45 degree angle, another flash above those two but on an acuter angle.  I placed the last flash on the left hand side for fill light.  I hope to create a soft shadow on the left hand side of the paint sculpture and the three flashes on the right hand side should be sufficient to cast it.  All of the flashes have their wide angle lens popped down under the diffusers and I have placed black card blocking the light from hitting the background to black it out.


I put a plank of wood on two stands for a table and connected the speaker up to the Sony amp and the computer tethered to the camera and amp to generate frequencies.


I setup my Canon 5D mkIII with a Sigma 150mm f/2.8 on a tripod, focusing rail and connected my remote release.  I put around 10 spoonfuls of paint on the latex in the center for a first test and played 110hz through at "2" on the volume control of the amp.


 This is the image that was captured with a delay of 25ms.  The delay was way to short, the maximum height that the paint reached was around 2", to photograph that it would need a delay of around double what it is currently.


After 3 more photos of refining the delay and volume for 110hz, I ended up with this.  With a delay of 65ms and upped the volume to "4".
 

After a few more photos there wasn't too much paint left on the latex so I mixed up some more with what I got from school.

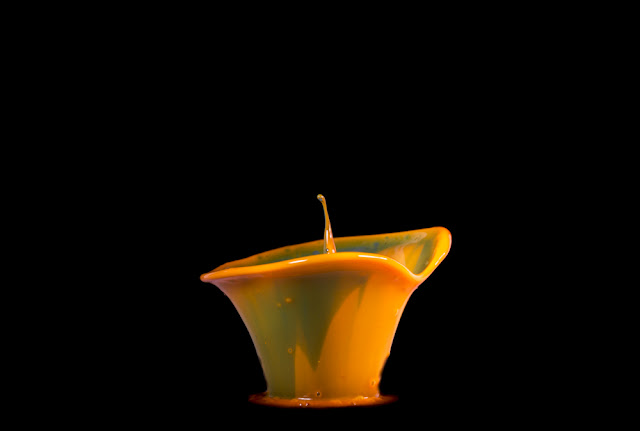
I wanted to do bigger everything so I added loads more paint onto the latex this time and put some layers of different colours on there.


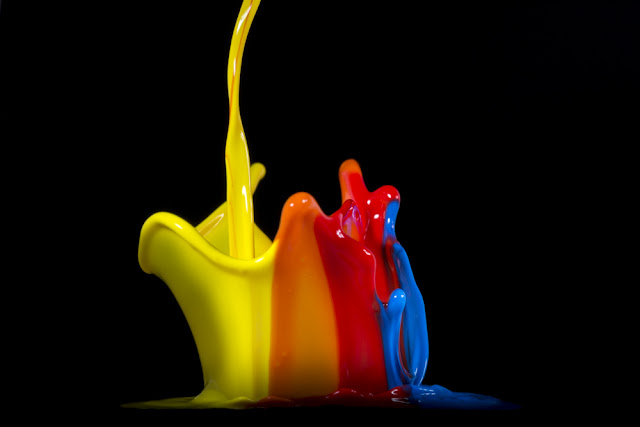
And this is what I got, I also changed the delay to 65ms and volume to "4.3".


After the first photo the green overpowered all the other colours.  I pushed all the paint back into the middle of the speaker and then put some water around the outside to see the effect.  I also changed the hertz from 110 to 60 and volume to "4.5".


I wanted to see the setup to, so I moved the tripod back.


I changed the delay to 85ms, recomposed and moved all the paint back into the middle.


The paint made this round formation because I didn't move it all back into the center.


 Recomposed once again to see the height.


 This is how the paint spreads from the frequency and the amount of mess (its a lot worse on the floor and walls).


I wanted to see how high the paint would go.  I turned all the lights on and set the camera to video.  The whole sculpture went around 60cm high.  This means I can set the delay for a lot longer to see the maximum height!


I want to try shooting the video at 60fps or with a camera with higher speeds and slow it down.
After cleaning up the majority of the paint I put drop cloths over the whole setup to keep the dust off (it will be a while before I get to take more photos and the location is very dusty. + expensive equipment!)


Making Latex Frames

To cover larger speakers to create bigger paint sculptures I decided to use Martin Klimas's idea of using a latex sheet wrapped around a frame.

Martin Klimas
 I first tried using a picture frame and masking tape to hold the latex, but it was difficult to stretch around the frame and the masking tape bonded with the latex after a few days.


I bought three sheets of latex off a fetish clothing website.  White, black and translucent all around 1x1m and 0.25mm thick.


I thought the best way to mount the latex would be with fly wire screen frame. 


 I measured out the length I wanted (I think it was around 145mm).  I cut eight lengths at a 45 degree angle with the indent on the shorter edge (the opposite way to what the picture is showing below).


I filed the corners to make sure there would be no sharp areas for the latex to rip and to make it look better.


 I pushed the corner pieces in and made the square frame.


I measured the latex to be an inch smaller then the frame and cut it to size.

 Cutting latex is really difficult because it is so stretchy.  I had to find a pair of scissors that had very sharp, but more importantly really close together blades that wouldn't let the latex stretch.


I also bought a Spline Roller to help push the rubber cord into the frame.


The roller did a great job of pushing the cord in evenly.  The latex was a little tighter then I wanted it to be and didn't flex as much as I was hoping around the speaker, but it will still do exactly what I want it too.

I made another frame with the other four frame edges and put black latex on that.  I also made the latex larger for it to be a little more stretchy.

Blogger templates